Showing posts with label makeover. Show all posts

Wednesday, December 19, 2012

Master Bedroom makeover

I wanted to paint our room and make it more airy and light. I ran the idea by Justin thinking he would say no way do we have the time for that after making over the boys' room and the nursery (plus an entry way closet makeover...I'll be showing you that soon) but he said sure! When I am given the green light I am not slow to get started! :) I was inspired by The Lettered Cottage blog where they painted their sun room Benjamin Moore Cloud Nine. Like they said "it was the exact grey-to-white-to-warm ratio." I went to Lowe's and had them do a color match with their ValSpar signature paint so we now have our own version of cloud nine which was way more white than I thought it would be but love it so much. The room feels so much bigger, cleaner and happy. I really can't wait to get some creations on the walls! I did a few hours of rolling and Justin did a few hours of edging over a span of two days and voila! We had to sleep in the guest bedroom one night but my hips hurt so bad the next morning (this is pregnancy related) that we finished our room ASAP so I could sleep on our softer mattress with all of my pillows. I'm such high maintenance when I'm growing little humans! :) Here is a sneak peek of our new room (and we now have a King bed!) but first the old room:
and the new room painted in cloud nine...


Whadda ya think!? 
Pin It

Monday, December 10, 2012

garage sale find

Steilacoom is my cute little hometown that was the first established town West of the Mississippi and is known for it's charm and historical homes. We have a precious little wagon shop, old school barber shop, ice cream parlor, etc. It is one cute little town! There are tons of garage sales throughout the summer here and I can't help but stop at them to see if a treasure is to be found. It really is one of my favorite things to do. Garage sales trump thrift stores (with exception of St.Vincent DePaul). Most people are trying to purge and clean out and just want their stuff gone. Don't mind if I do! This house I stopped at two summers ago had these old windows for $5 that I couldn't pass up. Actually I did pass them up and then turned back around to purchase them after I found enough change in my car! Yes, I payed in change. That was before our Dave Ramsey kick which is all about cash. My credit cards do me no good at garage sales! Along with the windows, I found a patagonia snow suit that I purchased for my friend Libby's daughter for a buck! Gosh, I love a good find! These windows were a deep blue color so all I did was put on a quick coat of white spray paint, enlarged some pics to 8x10 with white borders (costco) and placed them on the window with a thin piece of double sided sticky tape that you can't see and then finished them off with some burlap scraps. They usually hang in my bedroom on each side of the bed but right now we are giving that room a makeover - imagine that! :) They are going to be hanging out in baby girl's room until they are ready to go back up in ours. In the summer, I always suggest a quick stop for a glance over at a garage sale and remember to carry some cash!


Pin It

Sunday, December 9, 2012

boys' room with the new camera

...just had to document some pictures of the boys' room with our new camera. Told you there would be a picture overload! :)


We have been lowering Boone's side of the crib at night to start the transition in a big boy bed. He has escaped a few times but is sensitive to discipline and hasn't tried getting out in two nights now. He said he is ready for his big boy bed. :) We aren't in any big hurry now since he broke the crib last week. Seriously pulled a whole slat off. If anyone hears of a good white crib for sale, let me know!

Pin It

Friday, December 7, 2012

a little glimpse of girlyness

Sometimes I just walk into the nursery and stare. Stare at the little items of pink and all the sweetness that surrounds them. Everything is so delicate and precious and I love every bit of it. Justin and I tackled her nursery a few weekends ago which of course put this planners heart at peace. We primed, painted, moved some furniture in, ordered her rug, made her mobile and installed my great grandmas chandelier. We just need to add some wall decor, a crib an incredibly loved baby girl and all is well! I love going into her room with my boys. They love to look at her clothes and try on a few of the headbands we have for her. They pull out her little ruffly pants and tights and giggle. It's like they have never seen this stuff before! They are more than excited to meet this baby girl and they talk about "baby sister" everyday. Sterling tells the world about her and makes sure every human that he comes in contact with that he will be changing her diapers "all by myself". They are even into setting their hands on my belly until they feel her kick. They squeal and say "ow! baby sister kicked me!" and then run away giggling. It's pretty sweet and I know her arrival is going to change our world forever. Here are a few pics of her soon to be dwelling place and some of her sweet kicks.

My Great Grandma Kitty's Chandelier. She was born in I believe 1907 so who knows when this is from. The 40's or 50's maybe? I love being able to pass family heirlooms down!
 OH my. Little girl shoes. Can barely handle it.
 Wishing I had a pair of pink moccasins!
I love both of these thrift store finds from years ago. Sweet ballerinas and an angel that got a little white spray paint makeover. Under $5 for the both of them.
 All hand me down clothes from our annual MOP swap.
Can you handle the sweetness?!

Pin It

Sunday, November 18, 2012

Big boy room reveal

Remember Boone's nursery? Both the boys occupy this room now so there was a lot of switching, re-arranging, projects and love put into this space. Here is the old baby room....
And here is the big boy bedroom about 90 percent of the way done! (Sorry for the unclear pics) We still need to make Boone's bed to match Sterling's, buy matching bedding and maybe a few other pieces for the wall but you get the idea. The bed won't happen for awhile since we don't need the crib till March. They are such sweet brothers in this space together. I love how much they love sharing a room and we have definitely seen their relationship blossom since becoming roommates!


Here's that lamp from the post before. Isn't it kind of fun? It would of been neat stained for a wine barrel look as well. I wanted to use what I had on hand and you can't go wrong with white. Way better than before and free to us! Still need to paint the inside of the sticks so you don't see "Lowe's" written on each one. I also need to figure out that picture with a map from Paris. I think I'll try and find a fun boy print once I get up to Bellevue again to go to Paper Source! If you are looking for a cheap large print Paper Source is your place! The print is wrapping paper. Their wrapping paper comes in sheets with super fun prints for about 2.99-3.99! Expensive for a wrapping job and inexpensive for a print!
A packed and shared closet full of boy stuff!
An old side table that goes with my old bedroom set that used to be my great grandma's. It's very vintage looking from the front and a little girly with a gold flowery knob so I just turned it around so the drawer isn't accessible = not a million toys and other junk filling it up. Kind of nice. It also had a neat stencil on the back that solidified my decision of a backwards nightstand. We just use a little galvanized bucket on the bottom for books. They love love books at nighttime. The little lamp was free from my moms garage.


Here's a little bit of a breakdown of the room if you want to know where some of the items were purchased and the amount. Honestly it was probably a 40 dollar makeover. Once we buy bedding it will be a little more expensive but I really worked on keeping this room inexpensive using a lot of free pieces and hand me downs.
At the end of Sterling's bed....
That's it for now! We got started on our daughter's room (so surreal to say that) yesterday! We got a lot done only with the help of my sister and mom watching the boys for a 5 hr streak. Very thankful for them! We primed, painted, hung lighting and curtains in her room and I made a mobile. Phew! Today I am working on her dresser/changing table. Can't wait to show you what we have done so far! Just a few more projects and the room will really start coming together. Stay tuned for another room makeover and our new and improved entry way closets!


Pin It

Saturday, November 17, 2012

two boys + 1 room = big boy room makeover

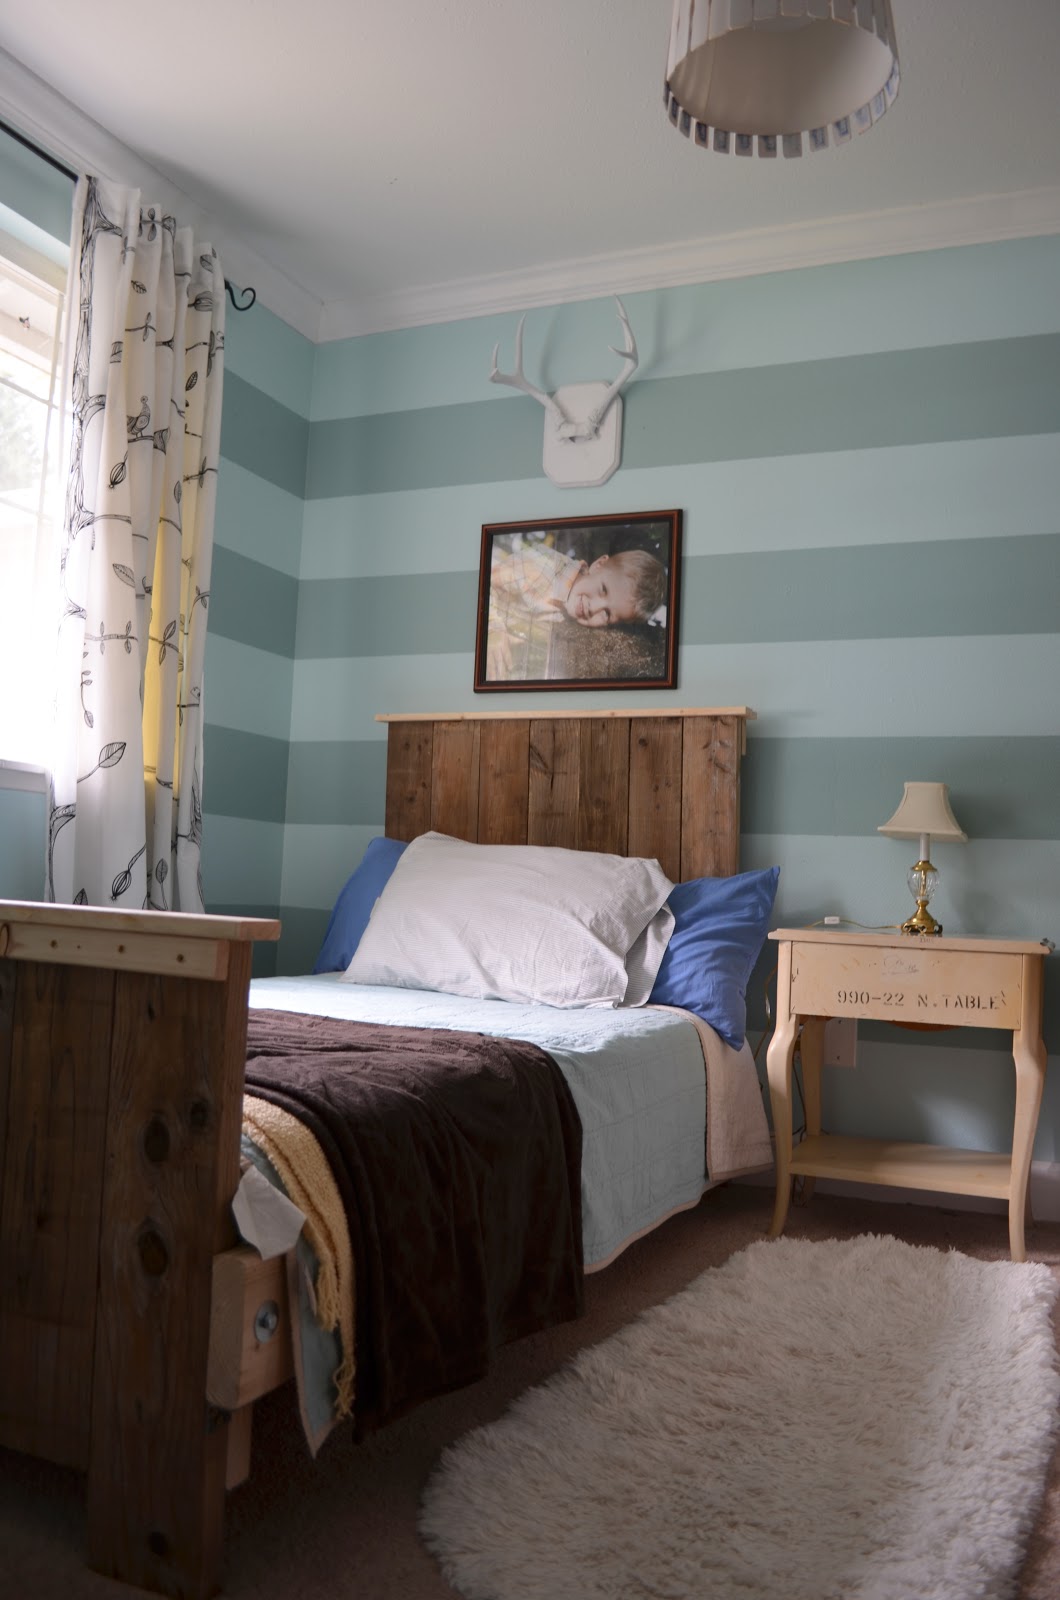
When we found out we were pregnant with our third we wanted the boys to be roommates ASAP. Here are our reasons for them sharing a room: 1. They were ecstatic about the idea. Sterling much rather sleep in the same room as Boone than have a whole room to himself. 2. We want to keep a guest bedroom available upstairs vs take up all 4 bedrooms and kick our guests to the basement. And having a designated toy room (combined with the guest bedroom) vs. having all their toys in their room is completely awesome. I never have to clean bedrooms! - just a really messy toy room but I can shut the door to that room! 3. Sharing a room makes for good teaching moments (stay in bed and turn off voices) and makes for disciplined sleep 4. It makes for a good relationship between these brothers. They pray together at night, giggle, tell each other stories and read books together. It's all sorts of preciousness to me. I told myself that I would makeover their room to almost completion before I started on our new baby's nursery even after finding out gender. I'm glad we got started early on the boys' room because I am chomping at the bit to start our daughters room. I've never gotten to decorate a little girls room before. SO.EXCITED. I have way too many ideas floating in my head...I need to get them out! You should see the lists I have. Justin looks at the said lists and says "wow, that's quite the list." I love that he will do every single project with me. Man, do I love that man! Okay back to the room makeover. I let Sterling look at some pictures of little boy room ideas and he really liked the idea of two big boy beds with pictures of the brothers above the headboards along with some cowboy theme intertwined. Perfect. Here are some of the projects we have been working on and though the room is not in total completion, it's about 90% of the way there.

Here are antlers from Eastern Oregon. These are some of my brother in laws catches from this year. Love that we can decorate using items from family and from the land. They were pretty fresh so I soaked them in a bleach water mix for a few days. The wood in the picture is what Sterling's bed is made out of. Best part? Totally free. We went to Lowe's looking for pallets and found piles of this stuff. We pressure washed it and let it dry out for a few days.
 I ran into Michael's and found these cheap wood plaques that I could paint and mount the antlers to.
And voila! A set of antlers for each boy. Their antlers match their builds. Sterling's on the left is tall and lanky and Boone's on the right are shorter and wider. :)
Next on the list was smuggling as many paint sticks from Lowe's as possible to re-do the boys lighting. At the first Lowe's I asked if I could buy paint sticks and the gal told me no but she could give me some. She gave me 2. Darn. At that rate we needed to hit up about 20 Lowe's to get the amount I needed. Justin went in after me and she gave him 8. What!? I think he looked like a contractor or something. I was a little disturbed that he got so many more than me. The second Lowe's there was a can of stir sticks out. Score! Justin went in and got a dozen. Then it was my turn and I matched his dozen. Oh yeah! We decided that was enough and felt completely ghetto at that point. I spray painted them white and let dry.
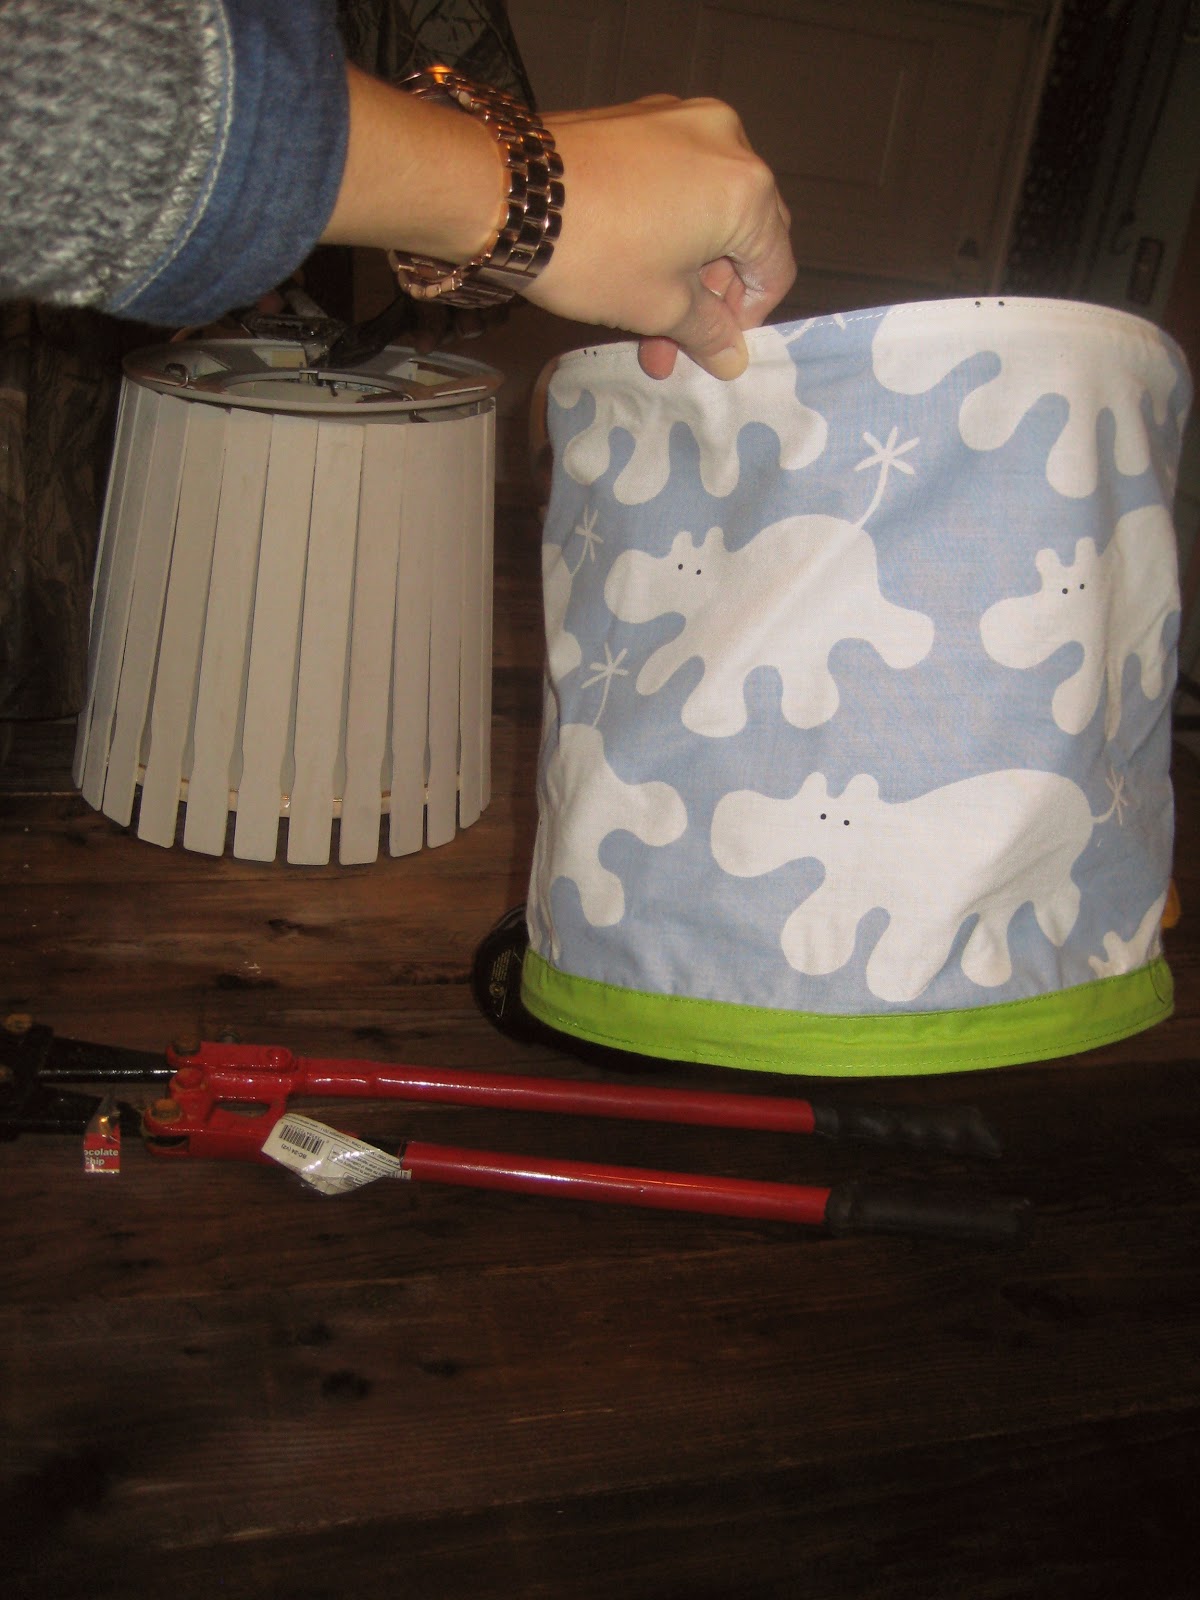
I took an old lampshade and my hot glue gun....
and began gluing around and around. The lamp shade wasn't a perfect cylinder so I need to make them gap at the bottom as the lamp shade got bigger at the bottom. No biggie. I saw this done about 3-4 yrs ago on a DIY show. Of course I can remember a project that many years out but can't remember the simple and probably more important things in life.
Here it is. Still a work in progress...
 We took the existing fixtures from Boone's old baby IKEA lamp shade and attached it to the new lighting.
 Before shade and after shade. Definitely baby to big boy.
Tomorrow I will show you how far we have gotten on Boone's nursery that has transformed into Sterling and Boone's big boy room. They are pumped to show everyone where they sleep. They just love it in there. I'm really glad we have created such a sweet little place for the two of them. I'll be back tomorrow with more!

Pin It

Thursday, November 15, 2012

Give Thanks

I love the holidays! Who doesn't, though? Having Halloween, Thanksgiving, Christmas and then New Year's back to back have my boys going nuts. Sterling even asked me today if Valentine's day would be next? He is pretty excited about all the celebrations and now that he understands seasons he is quite observant at what is next on the celebration list. Leading up to the holidays, October is FILLED with birthdays for us. My sister in-law Chelsey, cousin Joe, cousin Sam, my mom, my Boone man, Garrison and my hubby Justin all have birthday's. Phew! I'm pretty sure we have been having parties every other day and I can't wait for the ones to come. Thanksgiving is one week away and I look forward to sharing amazing food with my family and giving thanks. There is so much to be thankful for. As in the list could be hundreds more like thousands of things long. Family, health, a home, food, friendships, church are just a few and most importantly thankful that God gave his only son, Jesus to die on the cross for our sins and to conquer death. Amazing.

On a not as important note: decorating. I don't like to over decorate my home for each individual holiday - mainly because of the storage space it takes and the time to put them out and then pack it away. Christmas decorations win in quantity in this home and I think it will stay that way. We did a couple Thanksgiving projects that were simple. My favorite was the free printable that I found off of pinterest from Tom Kat Studio. All you had to do is order it (12.50) and then enter their promo code and it was free, sent to your email to download. Thank YOU Tom Kat Studio for making life easier on us decoration lovers who are slightly incapable of making a simple, pretty and stylish banner. I would of tried it free hand with a crayola marker and been highly disappointed. :) I backed the letters with a brown card stock I had on hand and then taped it to a thick piece of twine. I love the simplicity of it and I love that Sterling reads it everyday and shows it to everyone (he takes ownership in art projects around here and I did let him help me hang it). It's the perfect segue of asking him what he is thankful for each day. Lately it has been "earth" ...minus the "volcanoes." 

...and that fire was made by me (so proud) and I even kept it going ALL day. I love drinking a cup of coffee and listening to worship music in this room. It's a perfect was to start my day.


We also added some "give thanks" to the toy room today on their chalkboard easel. Pretty sure that lasted about an hr without being smudged. Boone has already slid his fingers through the turkey. 


I can't wait to stuff my face and eat way beyond my needs. I'll have one happy baby girl with all the food consumption that is about to go down (at least I'm convincing myself she will enjoy it as well!). Happy Thanksgiving to you all!

...and who else is putting up Christmas decorations the next day?! I know I am!!

Pin It

Tuesday, September 18, 2012

My galley kitchen

Here is a little glimpse of my super small galley style kitchen. We have demo plans for the future (probably 3 yrs away still if I'm being realistic). It's super tiny with not much cupboard space but it does it's job just fine. The cupboards are original to the house which was built in the late 60's along with the dishwasher. They both gotta eventually go. The dishwasher hardly does it's job and the drawers are hard to open and shut and shed a fine dusting of wood particles when opening and closing. There are a couple of drawers I can't use. I try and see all the positives in this little space but I'll be honest it's difficult and is sometimes a stretch but I like to see them anyway. The positives: putting away dishes is just an arms reach away from the same standing spot, I can't hoard stuff and have had to simplify, my boys know where everything is and can help themselves to the snack cupboard (eeek) and feeding a crowd gets nice and cozy! You can't see much of the kitchen but you can get the idea...and there really isn't much more to see! ha!

Spoon and Fork: St Vincent DePaul - .99 cents. SCORE! Who goes looking for a spoon and fork and finds them in a junk yard? Yah, that's me! I find the strangest of treasures. They were a dark brown - white spray paint goes a long way. :)

Menu board: IKEA
Bar with organizers: IKEA
Curtain: Burlington Coat Factory (originally a long curtain that I turned sideways!)


Sometimes my counters are occupied by this little dude. I may of been blowing bubbles while trying to cook dinner. You gotta do what you gotta do. I'm sure there will be more kitchen posts down the road but I'll leave you at these cute pictures of this cute little Boone man half a year ago!


Isn't he sweet?

Pin It

Monday, May 7, 2012

a little bit of chevron

...and not the gas station. It's a beautiful print that seems to be making it's rounds all over pinterest and now in stores. Target has chevron printed baskets and kitchen hand towels that are adorable. I bought the hand towel for my kitchen in black and white because the red clearance sticker screamed "buy me" with a whoppin' 1.99 price tag. I love a good deal and a little pop of pattern in each room. I purchased our kitchen table at a thrift store about three years ago knowing that we were expanding the family soon and I wanted at least 6 seats for hosting. It wasn't the prettiest of tables but I knew I would eventually get my hands on it for some kind of DIY project. It was my birthday a couple of weeks ago and one of my gifts was to have my hubby all to myself and pick a project that he would focus on with me. He speaks my love language...seriously. So here is the project in picture form. I will try and explain the process as best as I can but I let my husband do most of the math in his head and I was A-Okay with that. I love that I married a math major...he whips up numbers and adds fractions quicker than I can count to ten. I would still be working on this table if it wasn't for him! Thanks babe!

{Table before}

Then I painted it white probably five months ago and covered it with a table cloth till we had the time to work on it. Here Justin is measuring the length and width of the table deciding on how many chevron "stripes" we want...

Putting our dots along the edge of where we want our peaks and valleys to hit. I decided I wanted 8 chevron's (though you should do an odd number if you want the top and the bottom to both be the same color...I am kind of eclectic and didn't really care - this may drive some of you nuts. Understandably so!). I also wanted all the chevrons to be the same size. Some peeps do a skinny one, then thick one, etc.
We used a chalk line to make even lines across the table. This was brilliant of my husband (he always likes a good excuse to go grab another tool) because the chalk wipes right off when you're all done.
Then we decided how jagged we wanted the chevron to be. You can have it dramatically going up and down or barely peaking. We then made dots on the chalk lines of where we were going to have the chevron peaks and valleys.
You then start connecting your dots diaganolly. Up and over then down and across. Where the tape lines look close together is where the white stripes will be. The tape goes on the inside of the dots.
Finished taping....
And start painting. I mixed the wall color from my dining room with a the light grey from my mantle/hallway bathroom and some white to tone it all down. I didn't want to be too matchy matchy with the walls and table.
Finished painting! I suggest you peel the painters tape off when you are finished painting. This way the paint doesn't dry and make it hard for you to peel or chip the paint. After the paint dried I painted the table with three coats of Polycrylic so it would have a clear and smooth top for wiping down.
...and Voila!

Email me if you want help or more tips with this project. There are many ways to make chevron patterns but we found this way to be the quickest and simplest! Happy crafting!
Pin It